What are SIS Imports?
The SIS Imports feature allows you to upload and integrate data from various Student Information Systems (SIS), complex databases, and even simple spreadsheets. Admins can use this feature to create users, accounts, courses, enrollments, and more. This process can be done manually via the SIS Imports link in the admin navigation or automatically via the API.
In this lesson you will learn about the following options for SIS imports:
- Standard Import
- Full Batch Update
- Override UI Changes
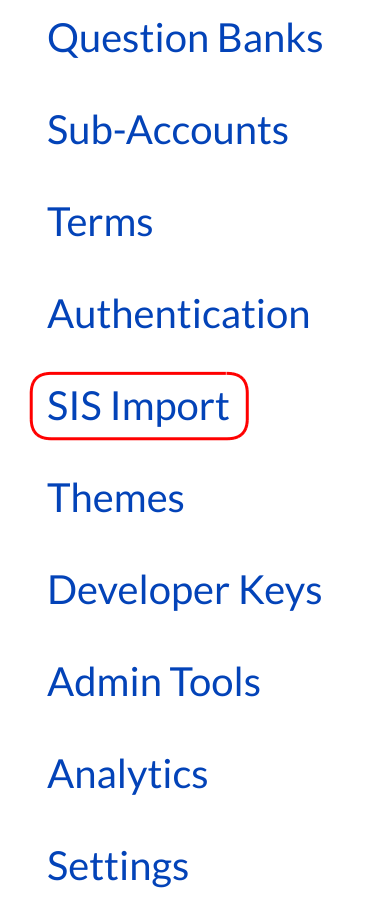
Click SIS Import

In the Account Navigation, click the SIS Import link. This link can only be found at the main or root account level. (i.e.SIS Imports will not be accessible at individual sub-account levels)
Note: If you don't see SIS Import on the account navigation, please reach out to your Sublime LMS ™ account manager. If you are an open source user, the Site Admin will need to first click the SIS Import checkbox in Settings to enable this.
Standard Import
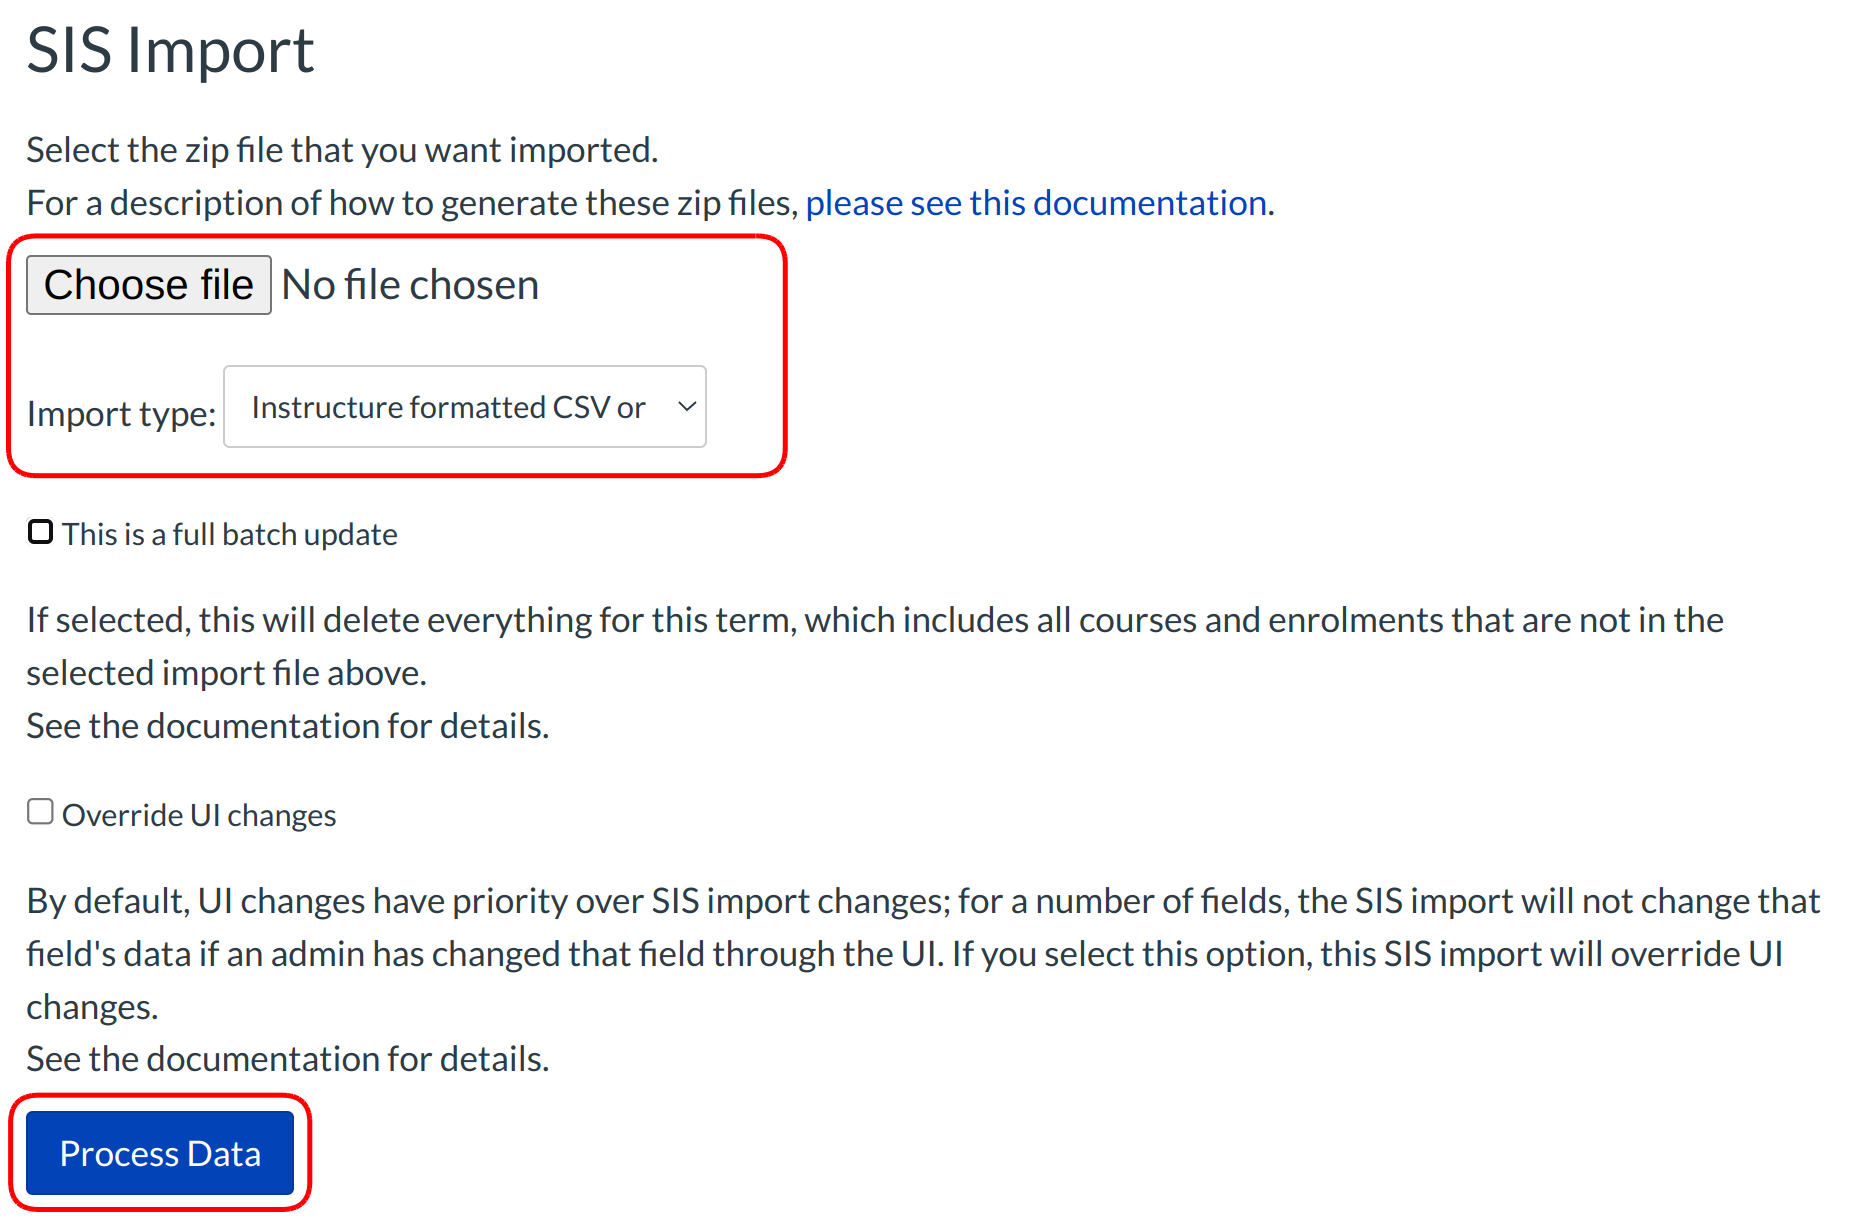
The drop-down menu provides a few formats for importing data to Sublime LMS ™: instructure formatted CSV or zipfile of CSVs, Banner Grade Exchange Results XML, or IMS Enterprise Specification XML zip. Click Choose File to select and upload a CSV or ZIP file to Sublime LMS ™, then click the Process Data button.
When using the Instructure format for importing files, you may import an individual CSV text file or you may compress multiple files into a single ZIP file to bulk import data.
Note: When uploading a standard import only changes that are specifically listed are processed. For example if a student enrollment was listed as active in a prior import, but not present at all in the current enrollment no change will occur to the student enrollment. The enrollment will remain active until marked as deleted or completed in a standard import or is not present in a Full Batch Update for the term in which the course is listed. During the beginning of a term, its typical for course enrollments to change regularly. Submitting a standard import frequently during this period (e.g. 3 times/day) will help keep enrollments up to date. These frequent imports will be much faster than a "Full Batch Update" (see next section,) so it's a more efficient process since you only need to update a few records. As these records change you can simply change a student enrollment status from active to deleted through an import file. Quick and easy! If you have many records to update across courses, sections, students and enrollments then a "Full Batch Update" may be a better option. Read on...
Full Batch Update
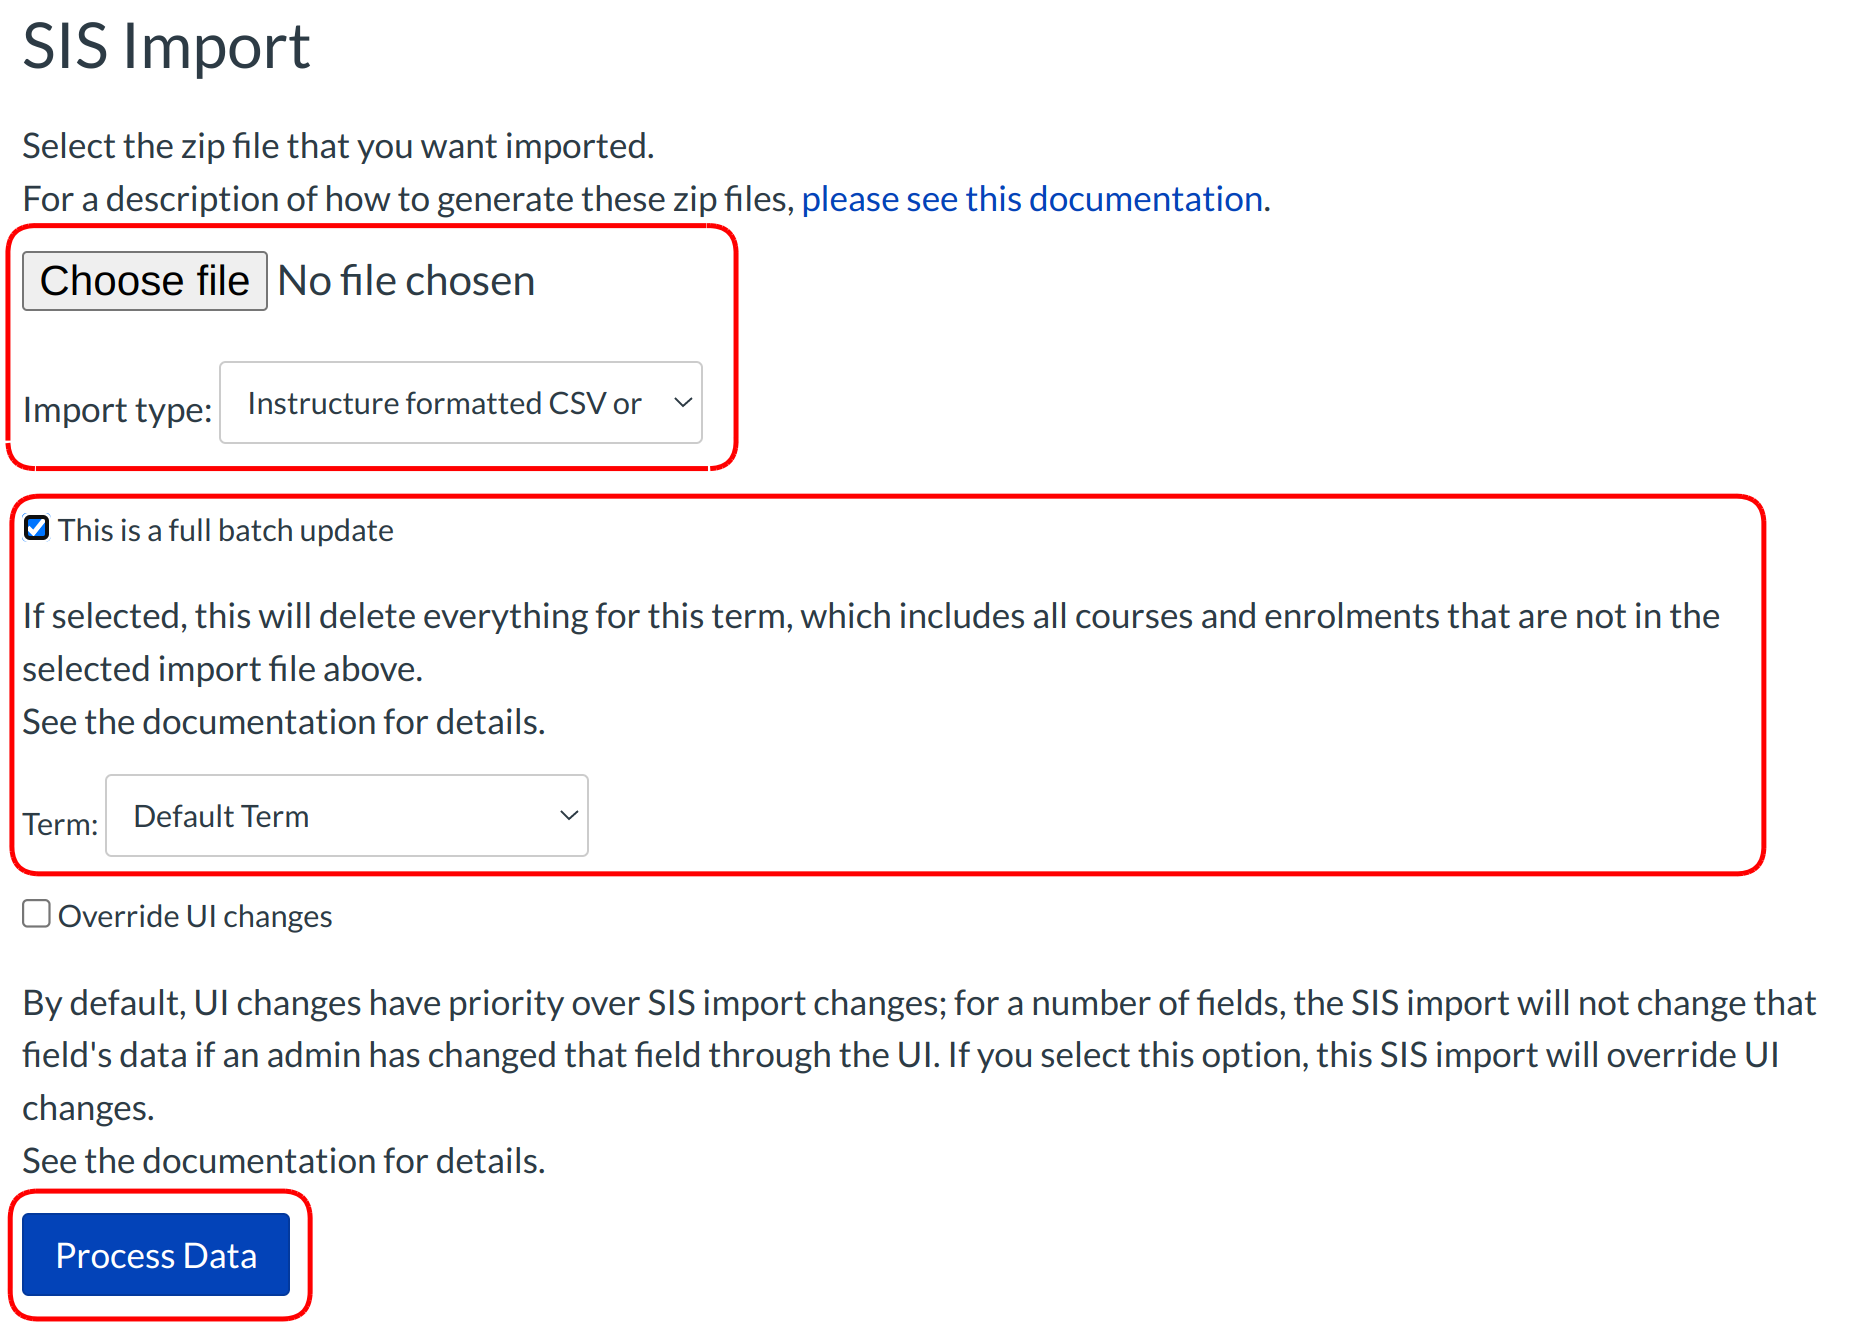
CAUTION! This is sometimes referred to as the nuclear option because it can delete large data sets without any prompt or warning for confirmation. This option will affect only data created via previous SIS imports.
By checking This is a full batch update, any Courses, Sections, or Enrollments with an SIS ID record in Sublime LMS ™ that is linked to the Term selected in the drop-down can be deleted. (For enrollments, this means the user and course/section which are linked need SIS IDs) A Sublime LMS ™ record will be deleted if it is not included in the current import file.
This option may be useful if:
- Your source SIS software doesn't have a way to send delete records as part of an import, and you need to remove a fair portion of the imported data
- You want to be sure your current enrollment and data set are consistent with your SIS enrollment and course data
- Your SIS doesn't track changes to course state or enrollments for students and/or teachers
- You want to delete courses that you have migrated to Sublime LMS ™ from another LMS.
Override UI Changes
It is important to understand how Sublime LMS ™ manages data entered manually in the system (through the User Interface or UI,) and what role imports play in relation to these UI changes. The following options are available when doing a standard import and full batch update.
1. Override UI changes
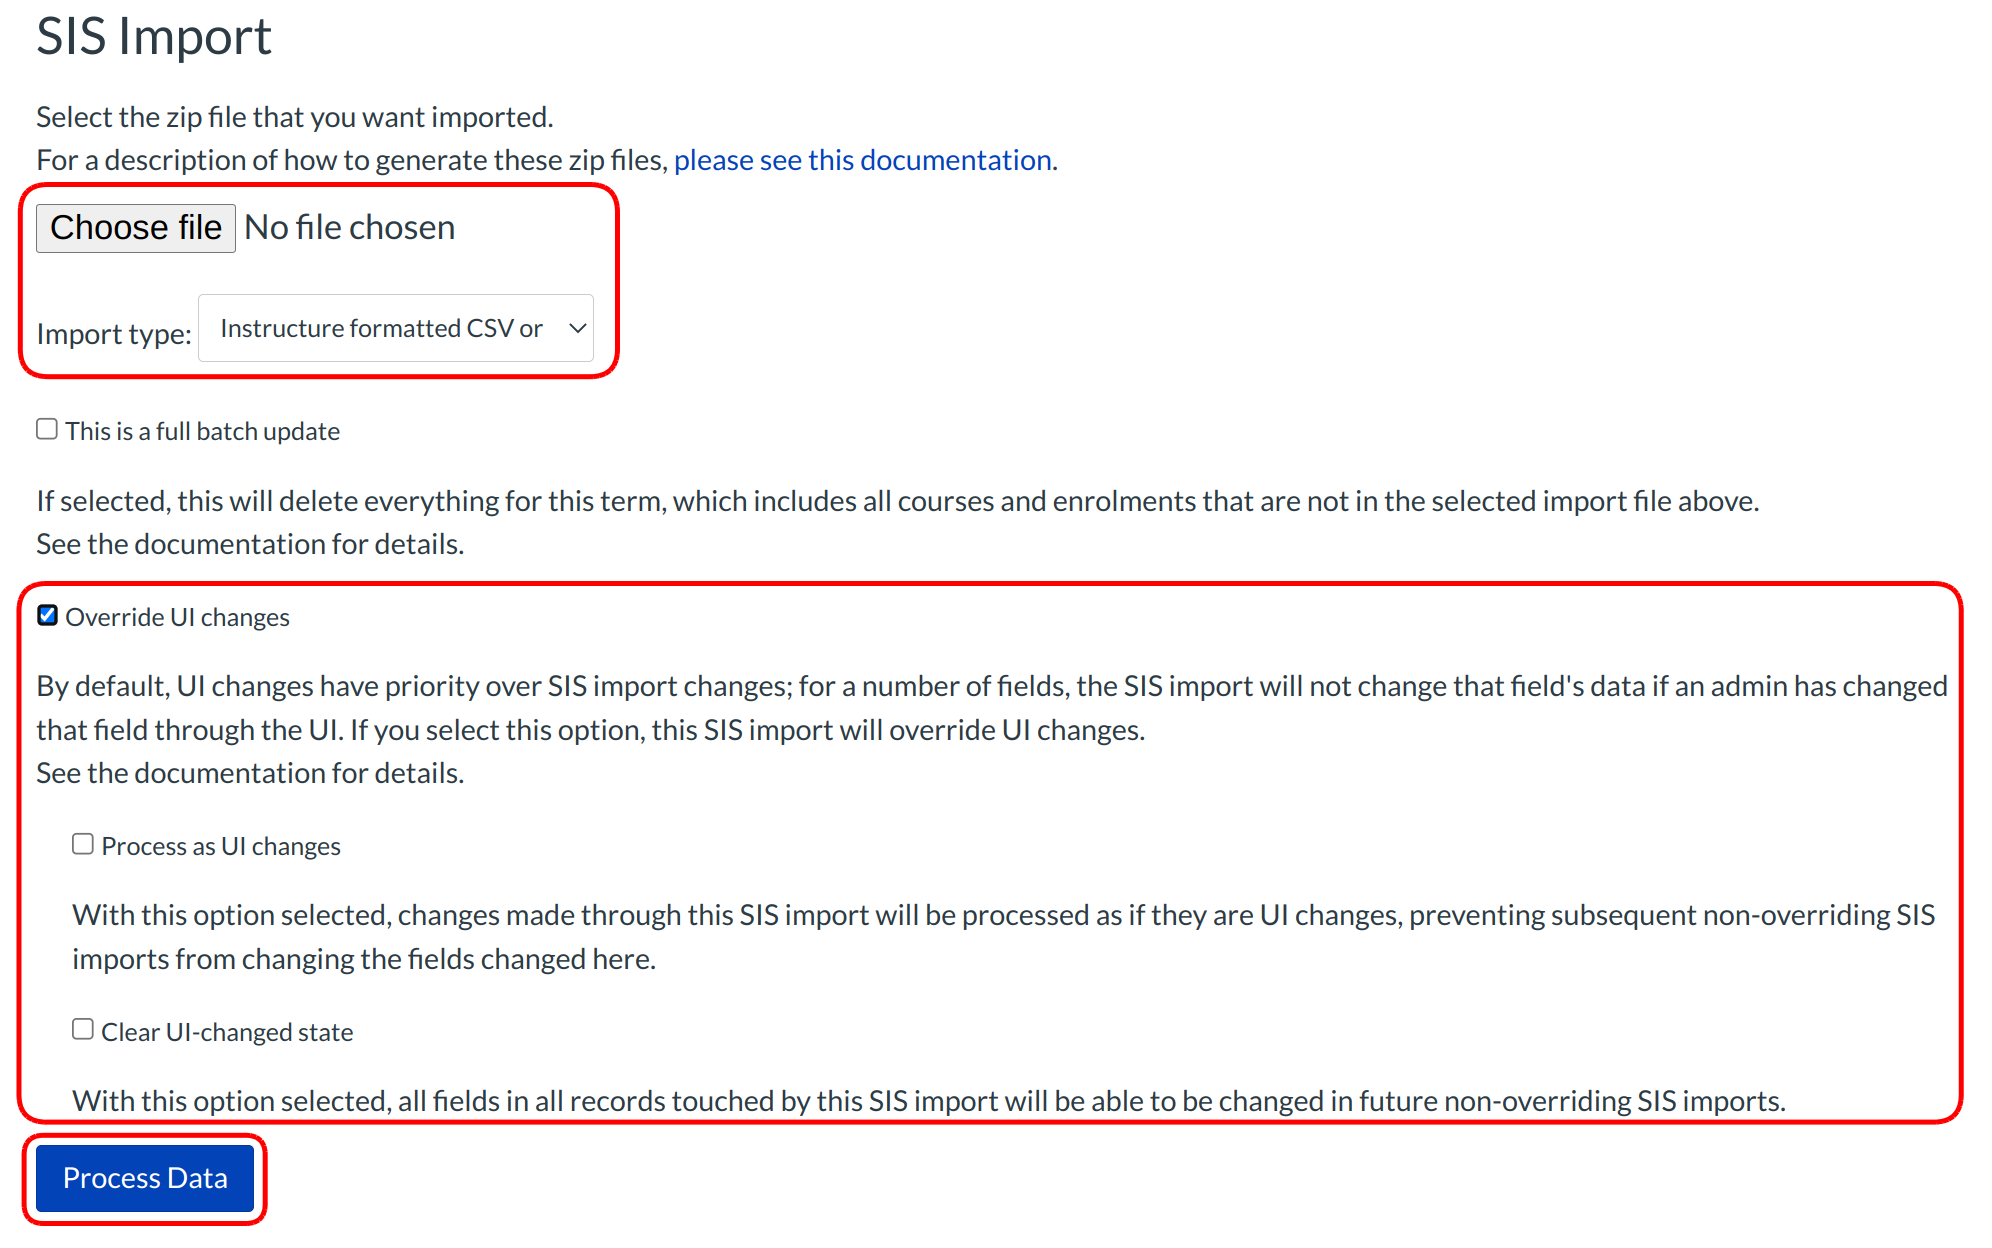
When a user makes a change to imported data in Sublime LMS ™ (e.g., changes his email address) we refer to this change as "sticky" or as the new "default." This means if you were to attempt an import with conflicting data, the data in Sublime LMS ™ would stick and the imported data would be disregarded. By selecting the Override UI changes option you are ensuring that Sublime LMS ™ overwrites any "sticky" data with the data that you are importing.
Caveats:
- If this box is NOT checked when doing a new users import, no name changes will be overridden in the UI, but if the user removed their listed email address it will be re-added, but not marked default.
- If this box IS checked when doing a new users import, the full name and sortable name change, but the display name is not changed. The email address is added, but still not marked default.
- Admins can prevent users from deleting their institution-assigned email address.
This option may be useful if:
- You forgot to remove the ability for users to change their names, to delete their institutionally assigned email address, change course names, etc and you want to run an update to be sure they are in sync. Note that this will NOT impact the user's display name if they changed it. Only the full name and sortable name would be changed.
- You allowed them to change their names (above example) on purpose, but want to periodically sync with your current data.
- You want to maintain control over the names of users and courses or if you know a name change occurred for a user or course.
2. Process as UI changes
After checking Override UI changes you can select this option. This option allows you to do an import and override changes that have taken place in the UI while having all of the data in this import labeled as "sticky" or marking all data that you import as if the changes were actually manually updated in the UI.
This option may be useful if:
- You don't want subsequent imports to overwrite the data you are currently importing.
3. Clear UI-changed state
After checking Override UI changes you can select this option. This option allows you to do an import and remove the "stickiness" of all data that exists in this import. This means that in future imports containing this data, no data in the UI will be labeled as "sticky."
This option may be useful if:
- You accidentally checked the "Process as UI changes" option and you need to fix the affected data.
- You forgot to remove the ability for users to rename themselves, course names or remove the institutional email and you want to clear the stickiness of the UI changes that have occurred.


